Publish on GitHub Pages
Goal
By the end of this page, your prepared app will be live on the web with a shareable URL, hosted for free by GitHub Pages.
Before you start
You need two things:
- A GitHub account: create one here if you do not have one.
- Your prepared program.
Choosing a GitHub username
Your username will be part of your site's URL and visible to anyone
you share it with, including future employers looking at your
portfolio. Pick something professional you will not mind saying in
an interview: a variation of your name beats xX_gamer_Xx. Adding
your school email to the account (GitHub allows several emails) also
unlocks student benefits and makes it easier for instructors to
recognize you.
The overall flow has five parts: create the repository, put your code in it, turn on Pages, run the workflow, and collect your URL.
Step 1: Create the repository from the template
- Open Drafter's deployment template (sign in to GitHub if it asks).
- Leave Owner as your account and give the repository a name. The
name becomes part of your site's URL, so pick something short and
descriptive:
pet-adoption-sitebeatsfinal-project-attempt3. - Keep the repository Public; GitHub Pages requires it on free accounts.
- Click Create repository.
The new repository arrives with a starter main.py and Drafter's
deploy workflow already in place, so you never have to set those up
yourself.
Step 2: Put your code in the repository
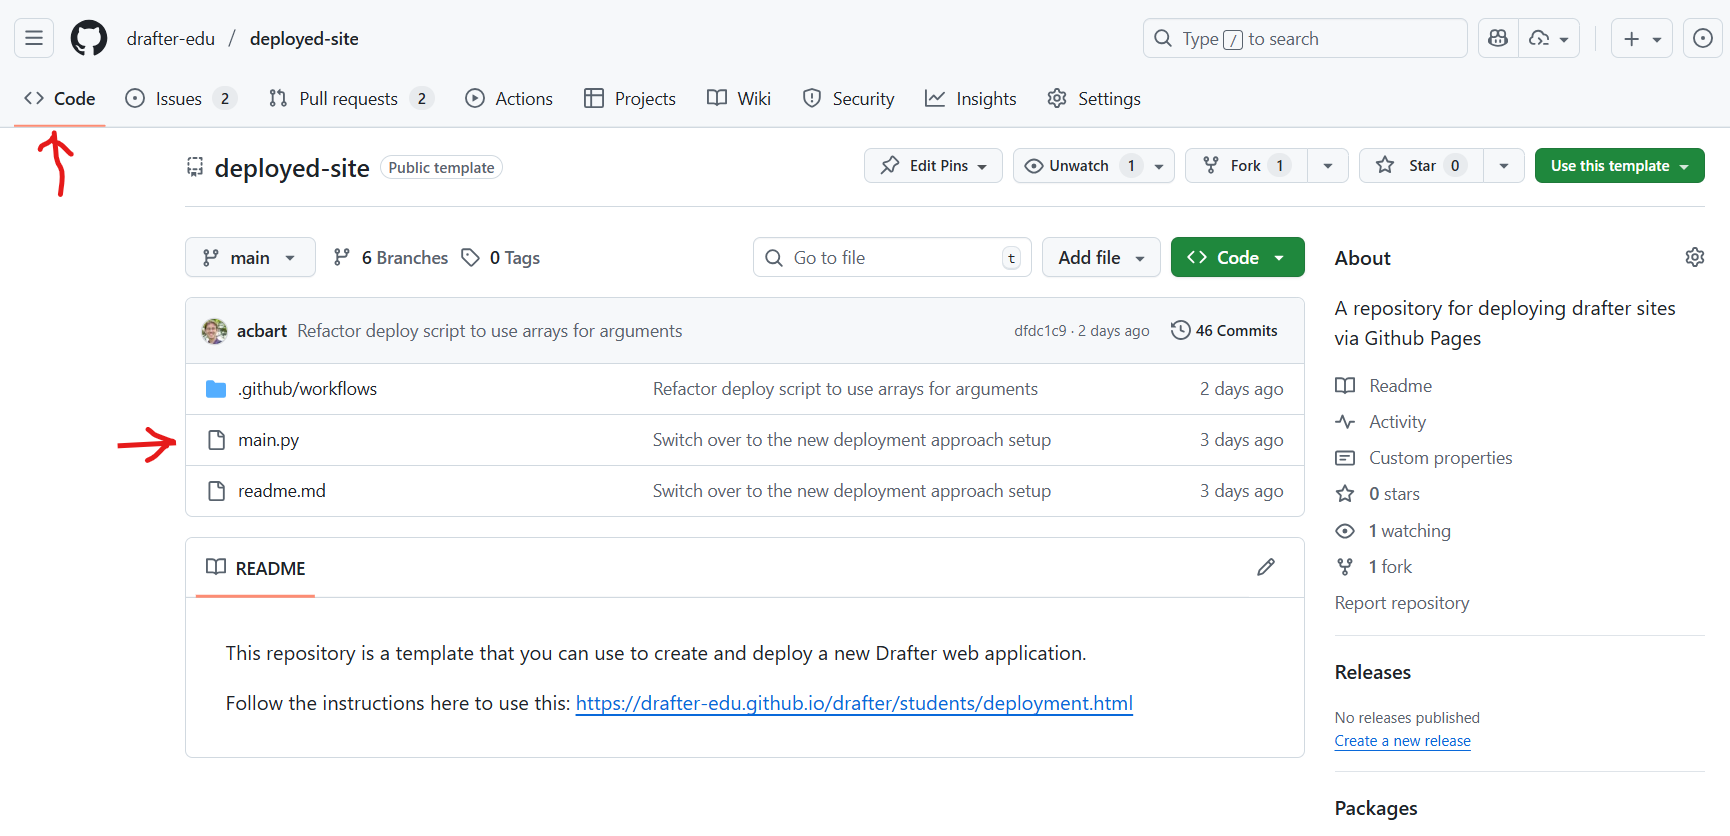
- Open your repository on GitHub and go to the Code tab.
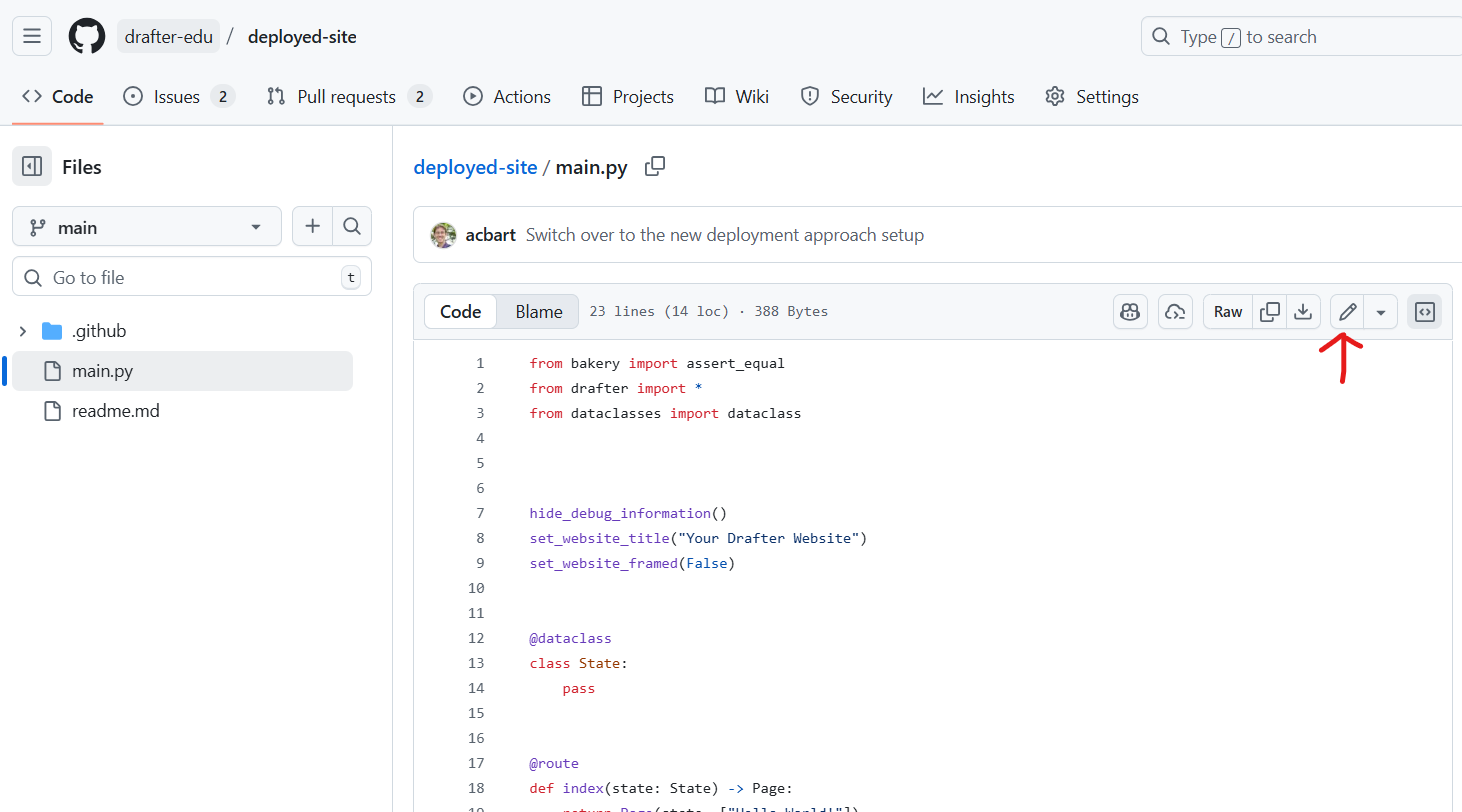
- Click
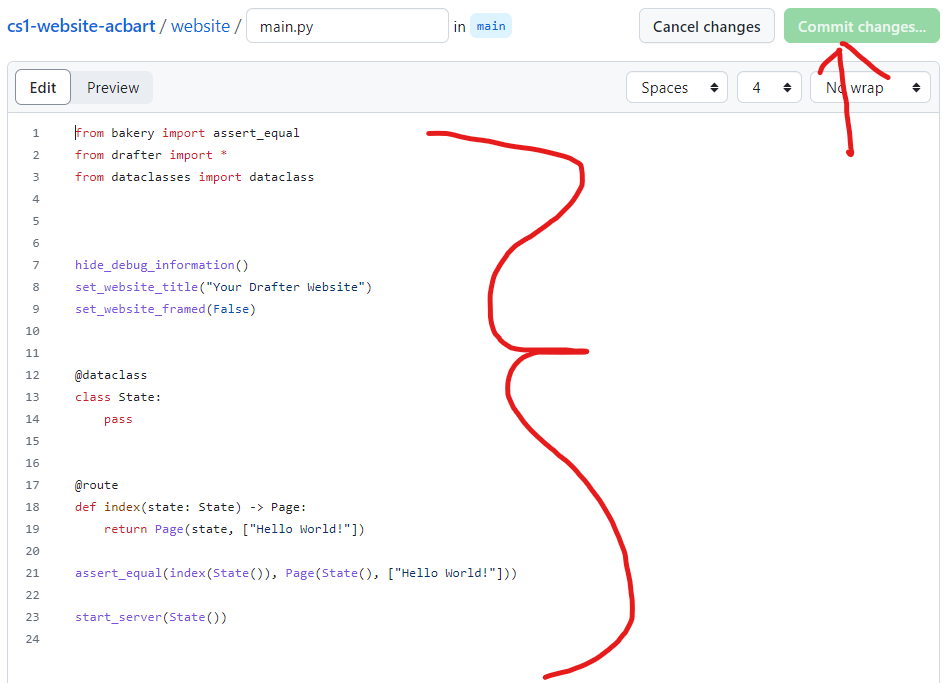
main.py, then the pencil icon to edit it. - Replace its contents with your program (paste from your editor).
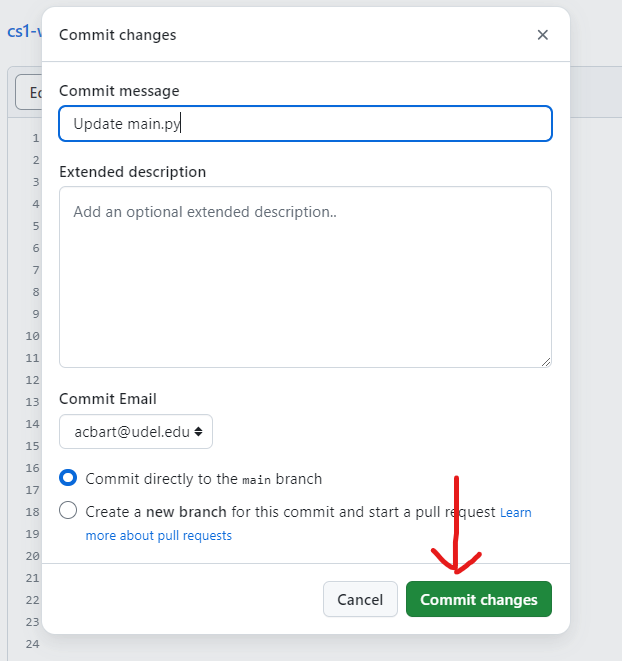
- Click Commit changes, write a short message describing the change, and confirm.
Show what this looks like
The Code tab lists the repository's files, with main.py among
them:
Opening main.py shows its contents; the pencil icon starts
editing:
After pasting your code, Commit changes is at the top right:
A box asks for a commit message describing your change:
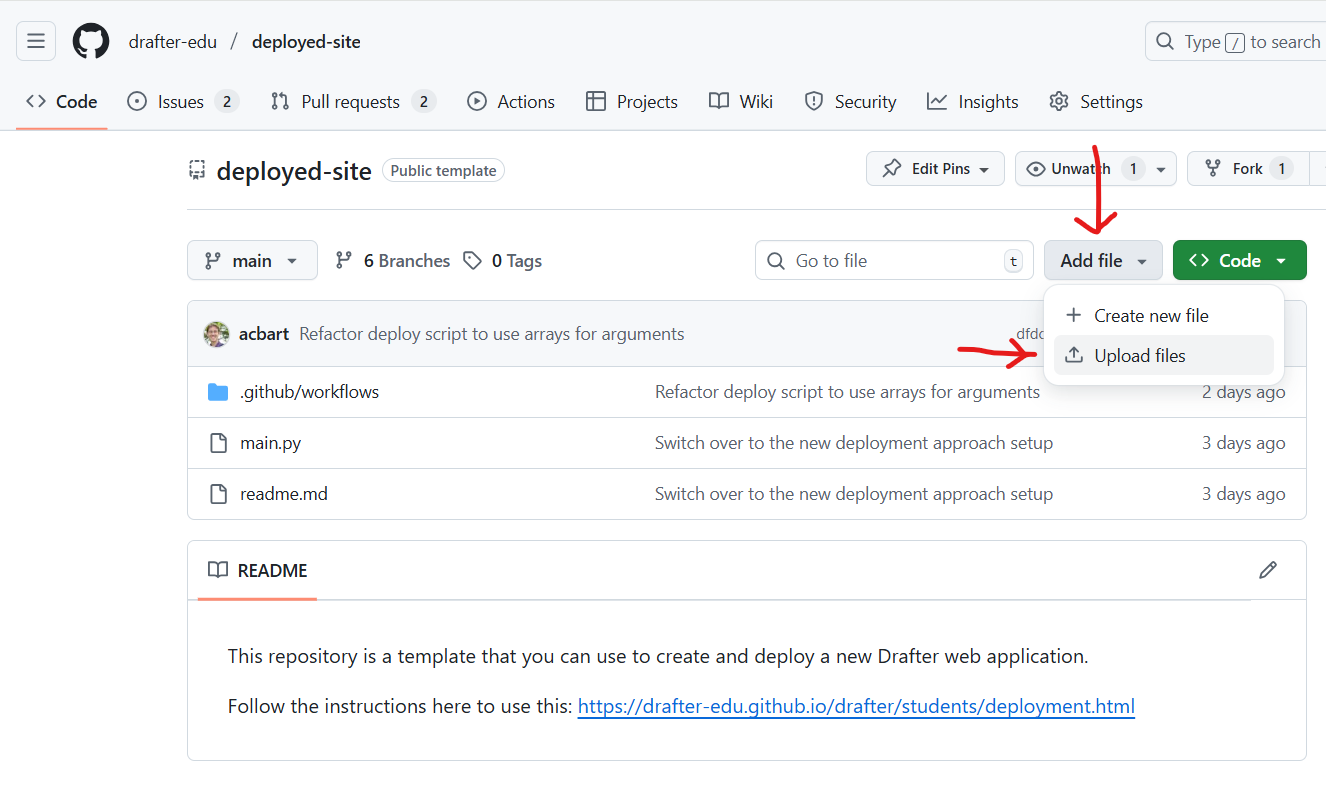
Your whole program lives in main.py. If your app uses other files,
such as images or data files, add them too: click Add file, then
Upload files, drag the files in next to main.py, and commit.
Every file your program opens must be here, or it will
404 on the live site.
Show the upload screen
Step 3: Turn on GitHub Pages
- Go to the repository's Settings tab.
- Open the Pages section in the left sidebar.
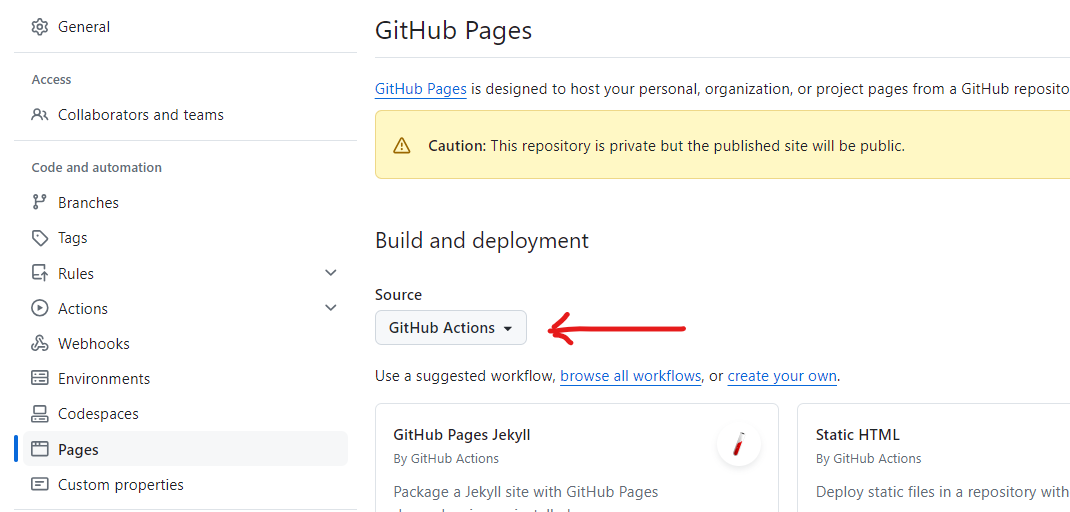
- Under Source, choose GitHub Actions.
This is a one-time switch. Skipping it is the single most common cause of a failed first deployment.
Show what this looks like
The Settings tab is in the repository's top bar:
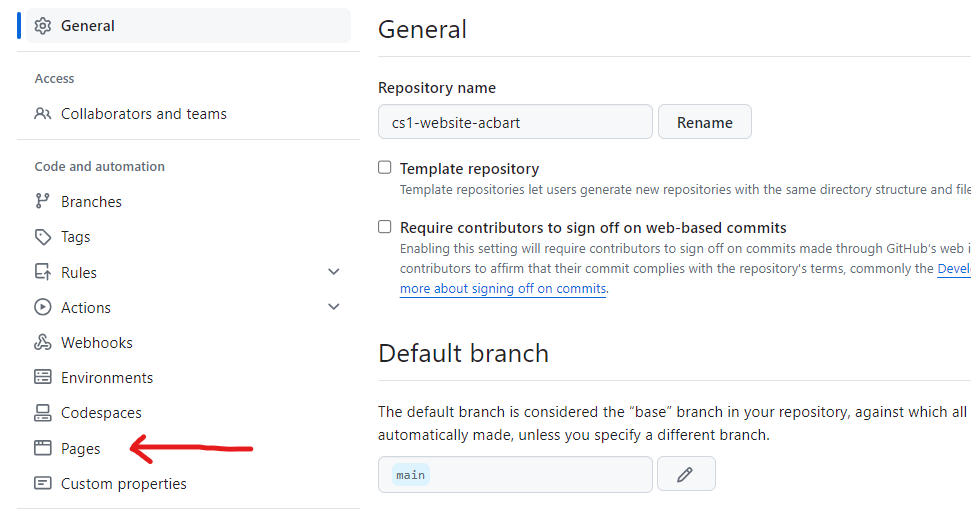
In Pages, set the Source dropdown to GitHub Actions:
Step 4: Run the deploy workflow
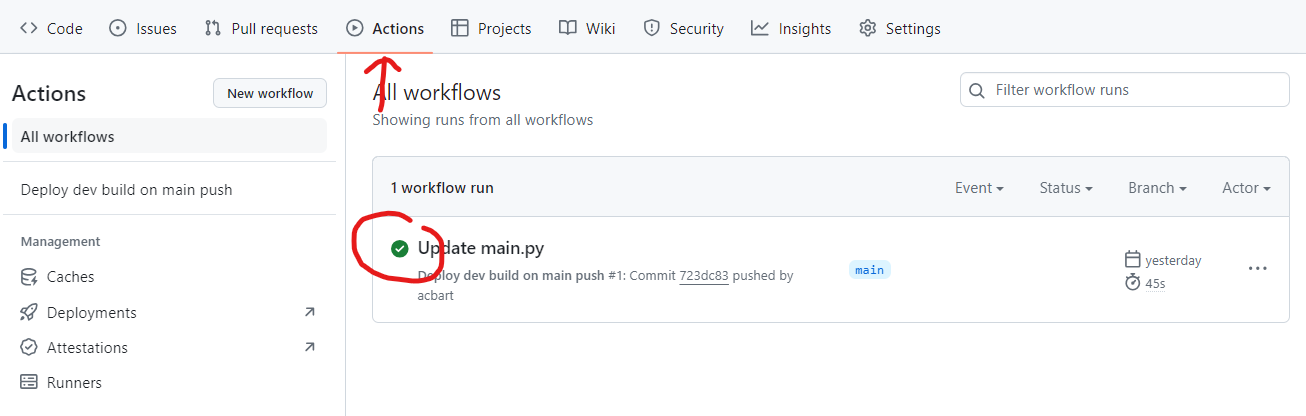
- Go to the Actions tab.
- Select the deploy workflow in the left sidebar (named something like "Deploy main branch as website").
- Click Run workflow, then confirm with the green button.
The deployment takes a minute or two. Watch its progress in the Actions tab: a green checkmark means success. A red X means something needs fixing, and Fix a failed deployment explains how to find the exact error and get back on track.
Show the Actions tab
Step 5: Find your URL and check your site
- Click into the successful (green) run; the deployed URL is shown in its summary.
- Open the URL and click through your whole app: every page, every button, any picture or file it uses.
- Open it again on a different device, like your phone.
Show a successful run with its URL
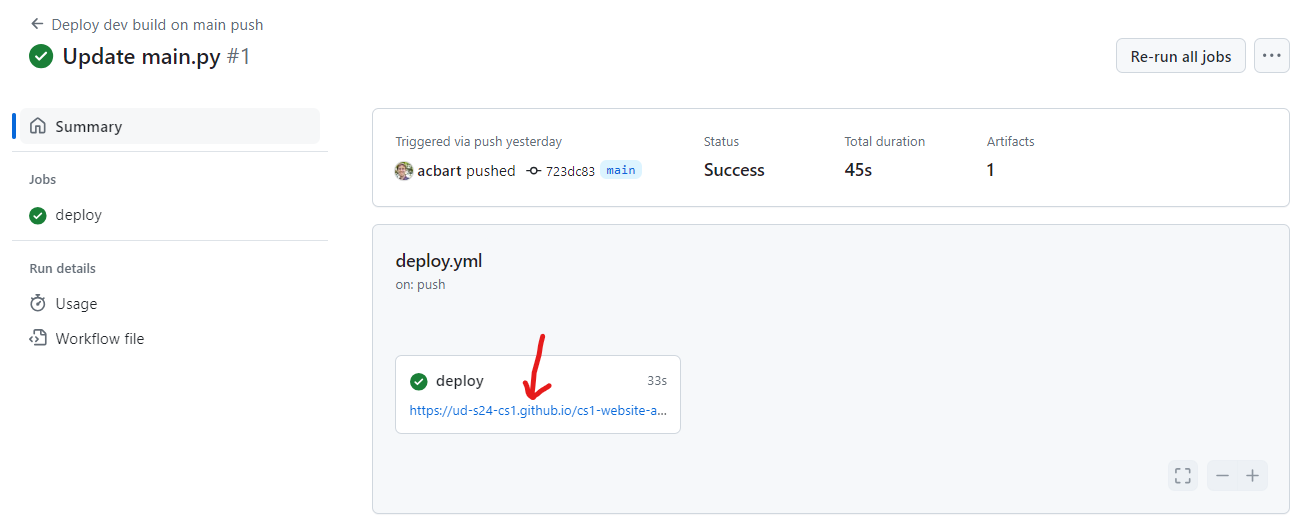
The URL looks like https://your-username.github.io/your-repository/.
That is your site's address. Share that one, not the github.com
repository link and not any localhost address.
While you are checking, add --about to the end of that address, like
https://your-username.github.io/your-repository/--about. That opens
the about page you filled in with set_site_information(...), so you
can confirm the author, description, and links all look right. Courses
often ask for exactly this link.
Does everything work, on both devices? Then congratulations: you built a piece of software and published it on the web, where anyone on Earth can use it. That is not a small thing. Save the URL somewhere you will find it again, because this link belongs in a portfolio.
One more thing before you celebrate too hard: if this project is for a course, you are probably not done yet. Courses usually have their own submission steps beyond deploying, so open your course's instructions now and finish those while everything is fresh.
Updating a deployed site
The site redeploys only when you run the workflow, not on every commit. To publish a change, edit or upload the files (Step 2), then run the workflow again (Step 4). The newest run in the Actions list determines what is live.
Common problems
- The first run fails immediately: Pages is probably not enabled. Redo Step 3, then run the workflow again.
- The site is up but a picture or file is missing: the file was
never uploaded to the repository. Upload it next to
main.pyand redeploy. - The site shows an old version: you committed changes but did not run the workflow again, or the browser cached the old page. Redeploy, then hard-refresh.
- For anything else, Fix a failed deployment shows how to read the error logs.
Understand it
Deploy and submit explains what compiling to a static site means.
See another example
The project gallery apps are all published this way.
Look it up
The deployment dashboard and logs are described in Fix a failed deployment.
Fix a problem
Fix a failed deployment and GitHub Actions build failed.
Next steps
-
Next: Get feedback on your design
Your app is live, which means people can actually use it. Learn how to watch them do it and make the app better.