Workbook
Modern application development is usually done through web development. We can use Drafter to make web applications that are easy to write and test. This workbook takes you through developing a few different web applications, piece-by-piece. We provide unit tests that you can use to check that you are building the software correctly.
Important
Read over all the instructions and text as you go. Many of your questions will be answered directly in the instructions! If you just copy/paste code, you will not learn much from this activity.
Bank Account
A bank account let’s you withdraw and deposit money. We’ll make a simple bank account application to support this. Preview this website at https://drafter-edu.github.io/examples/bank/.

Step 1: Download bank.py and put it into the same directory as the cookie clicker game.
The file contains the incomplete State, five incomplete routes, six correct unit tests, and a call to start_server.
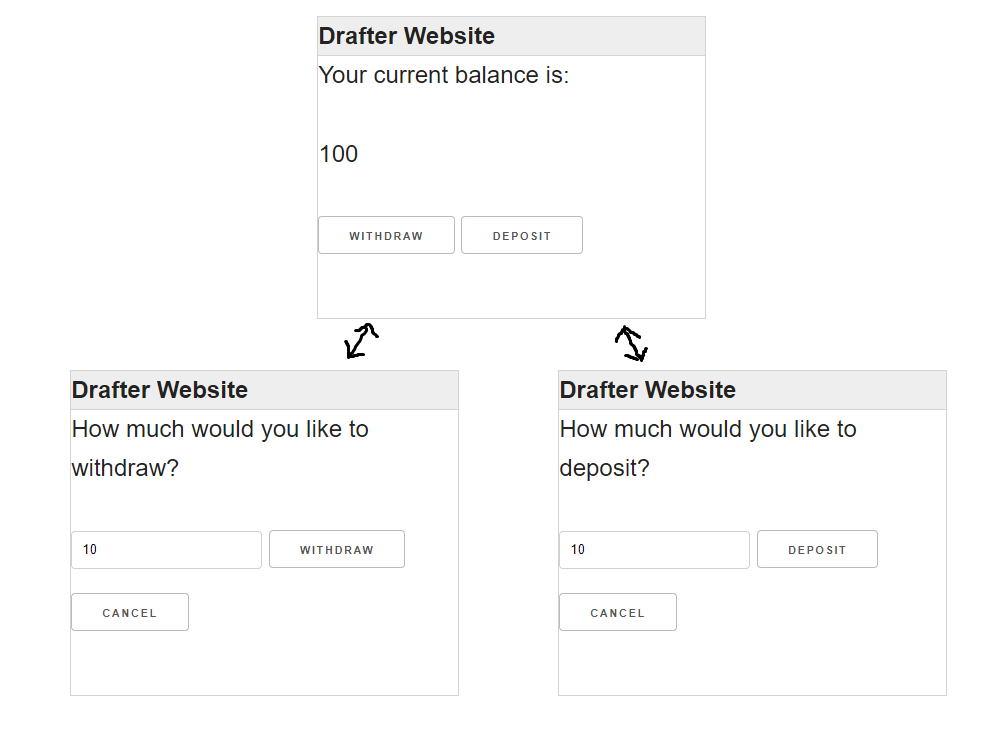
You might be wondering why there are five routes when the image above only shows three pages.
The reason is because two of the routes (finish_withdraw and finish_deposit) are routes that modify
the state and then return the result of calling the index route.
The diagram below visualizes the relationships between the routes.
        flowchart
    start(("Start"))
    index["index"]
    start_withdraw["start_withdraw"]
    finish_withdraw[/"finish_withdraw"/]
    start_deposit["start_deposit"]
    finish_deposit[/"finish_deposit"/]
    start --> index
    index -- Withdraw --> start_withdraw
    start_withdraw -- "Withdraw(amount)" --> finish_withdraw
    start_withdraw -- Cancel --> index
    finish_withdraw -.-> index
    index -- Deposit --> start_deposit
    start_deposit -- "Deposit(amount)" --> finish_deposit
    start_deposit -- Cancel --> index
    finish_deposit -.-> index
To explain a little further:
The
indexroute has buttons to go to thestart_withdrawandstart_depositroutes.The
start_withdrawandstart_deposithave buttons to go to thefinish_withdrawandfinish_depositroutes, respectively, and also have a button to go back to theindexroute (“Cancel”). Thestart_withdrawandstart_depositroutes also have aTextBoxto input the amount to withdraw or deposit, which is passed as a parameter to thefinish_withdrawandfinish_depositroutes.When the
finish_withdrawandfinish_depositroutes are called, they modify the state and then return the result of calling theindexroute.
Step 2: Inside the State class, add a balance field (an integer).
Step 3: You will need to create five routes:
The
indexroute will consume aStateobject and return aPage(like most routes). Thestatein the returnedPagewill be unchanged. The content of thePagewill be (in order):The text
"Your current balance is:",The current
balanceof theStateobject, as a string on its own line.A
Buttonwith the text"Withdraw"that links to astart_withdrawroute.A
Buttonwith the text"Deposit"that links to astart_depositroute.
The
start_withdrawroute will consume aStateobject and return aPage. Thestatein the returnedPagewill be unchanged. The content of thePagewill be (in order):The text
"How much would you like to withdraw?".A
TextBox()that will be used to input theamountto withdraw, initially10. Make sure you match the name for theTextBoxto the name of the parameter in thefinish_withdrawroute.A
Buttonwith the text"Withdraw"that links to afinish_withdrawroute.A
Buttonwith the text"Cancel"that links to theindexroute.
The
finish_withdrawroute will consume aStateobject and anamount(anint). Thebalanceof thestatein the returnedPagewill be changed to reflect the withdrawal. The function should return the result of calling theindexfunction with the modifiedstate. Note: Use theindexfunction inside of this function to avoid code duplication.The
start_depositroute will consume aStateobject and return aPage. Thestatein the returnedPagewill be unchanged. The content of thePagewill be (in order):The text
"How much would you like to deposit?".A
TextBox()that will be used to input theamountto deposit, initially10. Make sure you match the name for theTextBoxto the name of the parameter in thefinish_depositroute.A
Buttonwith the text"Deposit"that links to afinish_depositroute.A
Buttonwith the text"Cancel"that links to theindexroute.
The
finish_depositroute will consume aStateobject and anamount(anint). Thebalanceof thestatein the returnedPagewill be changed to reflect the deposit. The function should return the result of calling theindexfunction with the modifiedstate.
Step 4: Run the application and check the tests to see if you have implemented the routes correctly.
This example has shown you how to have multiple pages that link together, with some routes that do not modify the state and some routes that do modify the state. You also have now seen a textbox, which is a way to get input from the user, and how that input can be passed to another route as a parameter in order to update the state.
Simple Adventure Game
Now we’ll make a little adventure game with multiple pages that link to each other in a more complicated way, and also an item that you can pick up and use in of the rooms. To make things more exciting, we’ll have images of the screens in the game (generated using ChatGPT). Preview this website at https://drafter-edu.github.io/examples/adventure/.

Step 1: Download the images and the starting file for the game from the following links:
Important
Make sure the files are in the same folder as the python file. You can change the images but make sure they have the same filenames, or the tests won’t run!
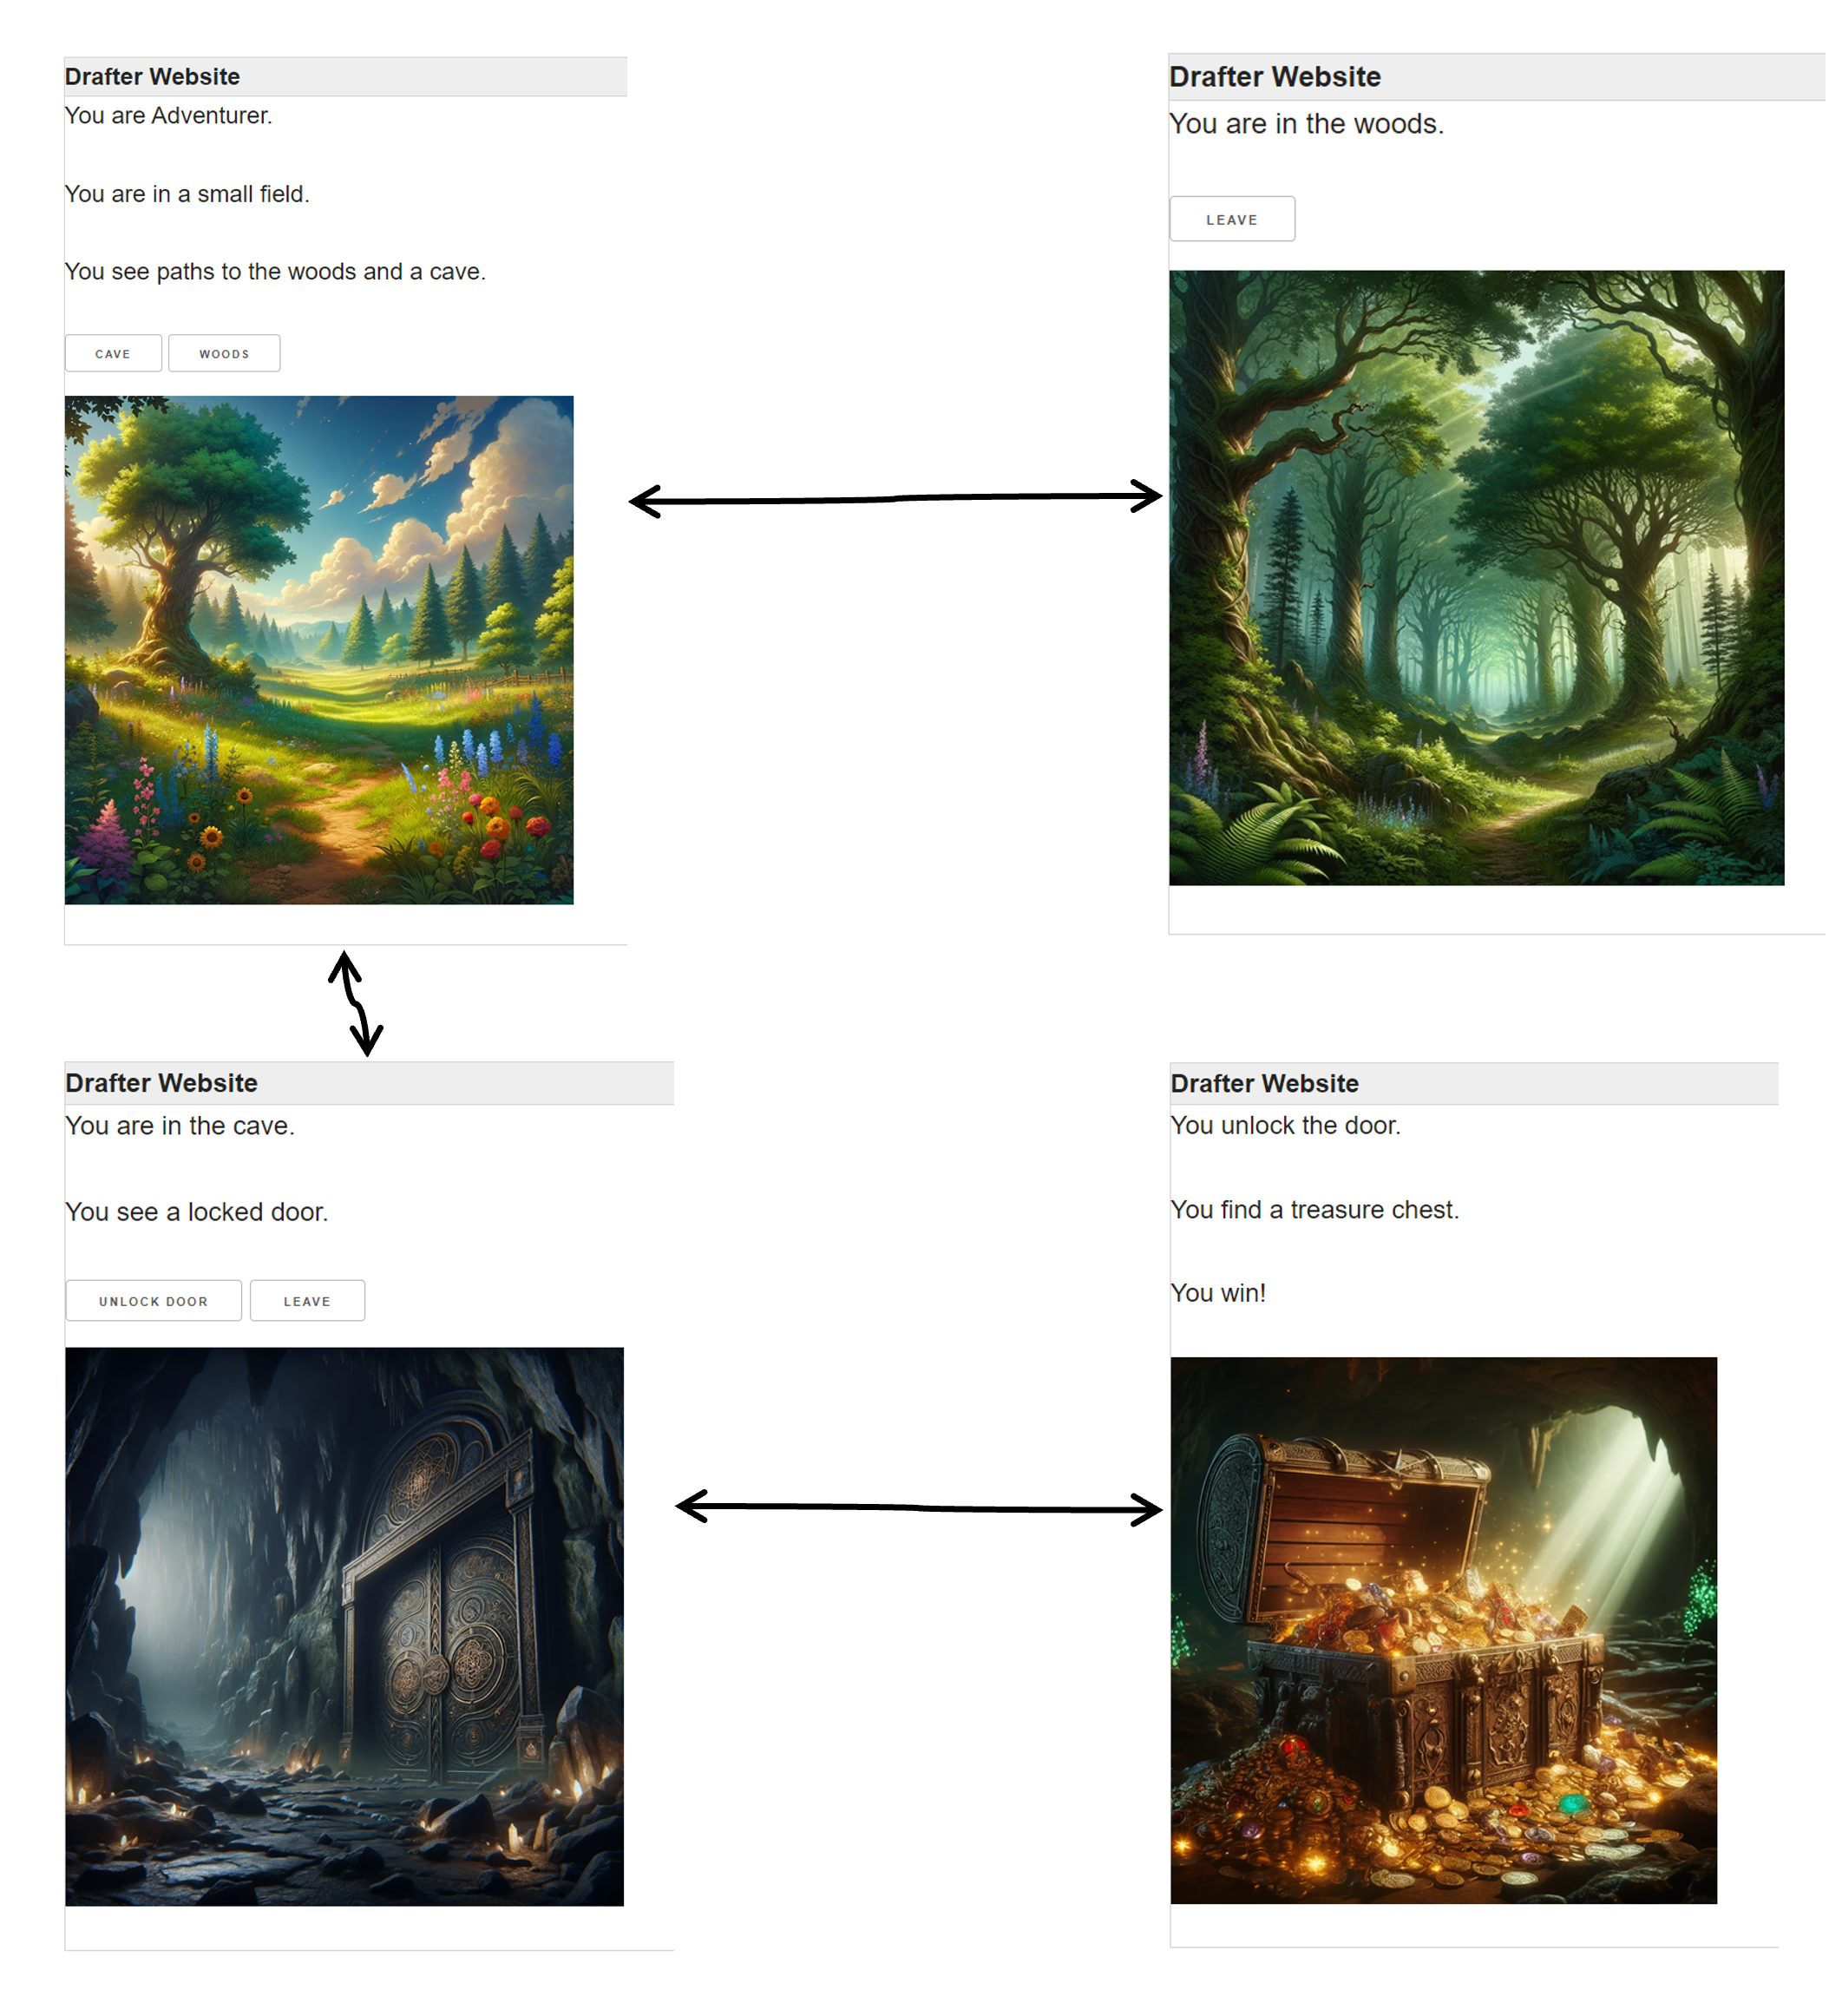
Once again, the number of routes and the number of pages do not match.
The diagram below shows the flow of the game. The game starts with the index route, where the player
enters their name. The player then moves to the small_field route, where they can choose to go to the
woods or the cave. In the woods route, the player can pick up a key, which will allow them to
unlock the door in the cave route. If the player does not have the key, they will be unable to unlock
the door and will have to leave the cave. The game ends in the ending route, where the player finds a
treasure chest and wins the game.
        flowchart
    start(("Start"))
    index["index"]
    begin[/"begin"/]
    small_field["small_field"]
    woods["woods"]
    check_has_key{has_key}
    check_missing_key{not has_key}
    cave["cave"]
    take_key[/"take_key"/]
    ending["ending"]

    start --> index
    index -- "Begin(name)" --> begin
    begin -.-> small_field
    small_field -- "Woods" --> woods
    small_field -- "Cave" --> cave
    woods --- check_missing_key
    check_missing_key -- "Take key" --> take_key
    take_key -.-> woods
    woods -- "Leave" --> small_field
    check_has_key -- "Unlock door" --> ending
    cave -.- check_has_key
    cave -- "Leave" --> small_field
Notice the diamond shaped nodes in the diagram. These are decision nodes. The game will have two different
paths depending on whether the player has the key or not. The Cave only shows the “Unlock door” button if
the player has the key. The Woods only shows the “Take key” button if the player does not have the key.
This means that you will need an if statement in your route to decide which content to show.
Step 2: Add two fields to the State class.
The
has_keyfield is a booleanThe
namefield is a string
Step 3: Finish implementing the following routes:
The
indexroute will consume aStateobject and return aPage. Thestatein the returnedPagewill be unchanged. The content of thePagewill be (in order):The text
"Welcome to the adventure! What is your name?"A
TextBoxthat will take the user’sname(the default value is"Adventurer").A
Buttonwith the text"Begin"that links to abeginroute.
The
beginroute will consume aStateobject and return aPage. Thestatein the returnedPagewill have thenamefield set to the value of theTextBoxin the previous page. Use thesmall_fieldroute to return the next page, rather than defining a newPageobject.The
small_fieldroute will consume aStateobject and return aPage. Thestatein the returnedPagewill be unchanged. The content of thePagewill be (in order):The text
"You are NAME."except replacingNAMEwith the value of thenamefield in theStateobject.The text
"You are in a small field."The text
"You see paths to the woods and a cave.A
Buttonwith the textCavethat links to thecaveroute.A
Buttonwith the textWoodsthat links to thewoodsroute.An
Imagewith the filename"field.png".
The
caveroute will consume aStateobject and return aPage. Thestatein the returnedPagewill be unchanged. The content of thePagewill depend on whether or not thestatehas thehas_keyfield set toTrue. If it is isTrue, then the content of the page should be:The text
"You enter the cave."The text
"You see a locked door."A
Buttonwith the text"Unlock door"that links to theendingroute.A
Buttonwith the text"Leave"that links to thesmall_fieldroute.An
Imagewith the filename"cave.png".
Otherwise, if the
has_keyfield isFalse, then the content of the page should be:The text
"You enter the cave."The text
"You see a locked door."A
Buttonwith the text"Leave"that links to thesmall_fieldroute.An
Imagewith the filename"cave.png".
The
woodsroute will consume aStateobject and return aPage. Thestatein the returnedPagewill be unchanged. The content of thePagewill depend on whether or not thestatehas thehas_keyfield set toTrue. If it is isTrue, then the content of the page should be:The text
"You are in the woods."A
Buttonwith the text"Leave"that links to thesmall_fieldroute.An
Imagewith the filename"woods.png".
Otherwise, if the
has_keyfield isFalse, then the content of the page should be:The text
"You are in the woods."The text
"You see a key on the ground."A
Buttonwith the text"Take key"that links to thetake_keyroute.A
Buttonwith the text"Leave"that links to thesmall_fieldroute.An
Imagewith the filename"woods.png".
The
take_keyroute will consume aStateobject and return aPage. Thestatein the returnedPagewill have thehas_keyfield set toTrue. Use thewoodsroute to return the next page, rather than defining a newPageobject.The
endingroute will consume aStateobject and return aPage. Thestatein the returnedPagewill be unchanged. The content of thePagewill be:The text
"You unlock the door.",The text
"You find a treasure chest."The text
"You win!"An
Imagewith the filename"victory.png".
Step 4: Run the application and check the tests to see if you have implemented the routes correctly.
This application showed you how to make multiple pages that link in more complicated ways, including
some pages that had different content depending on the state of the State object. You also learned
how to use images in your application.
Store
This activity is a little store where you can purchase items for a game. Preview the activity at https://drafter-edu.github.io/examples/store/.
In this example, we’ve already written the state and all the routes. You just need to make all the tests for us!
This is most easily done by just running the site, and then interacting with the shop. As you explore unique pages, tests will be generated at the bottom in the “Combined Page History” section at the bottom of the page. This will only retain unique visits, so you can’t just spam the same page over and over again.
You can also manually create tests by writing them yourself. Ultimately, though, you need to make at least 10 unique tests!
Step 1: Download store.py and put it into an appropriate directory,
where you placed everything else.
Step 2: Run the server, and then try purchasing things.
Step 3: Write tests for the store. Or rather, just copy the tests that have been generated for you at the bottom of the page.
Step 4: Run the tests with python store.py and make sure they all pass.

