Drafter Quick Start Guide
Drafter is an educational web development library for Python. What does that mean?
As a student, you can use Drafter to learn and practice Python by creating a full-stack website.
Let’s look at some code to get us started.
Once you’ve installed Drafter, you only need two lines of code to get started:
1from drafter import *
2
3start_server()
These two lines of code should yield a result like this:
Drafter server starting up (using Bottle backend).
Listening on http://localhost:8080/

Hit Ctrl-C to quit.
If you visit the url http://localhost:8080/ then you will see a page like this:
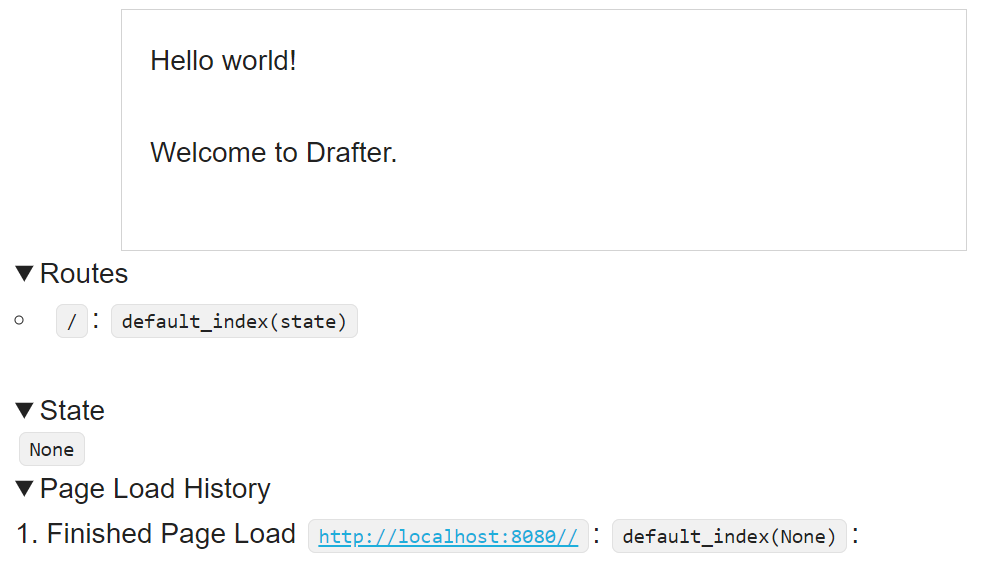
The top rectangle is the content of your website, which defaults to the message “Hello World!” and “Welcome to Drafter”. Down below, you see some debug information that will be helpful once we start adding more to our site. For now, you can see that we have a single, default Route.
0. Overview
Web servers connect URLs to webpages via routes. We need to begin by creating a route, a function that returns a Page. Each route will correspond to a URL (“uniform resource locator”) that uniquely describes a page of the website. When you visit a URL, the routed function is called and the resulting page is displayed to the user. These pages will have links to other URLs in the same web server.
Another useful feature of a server is that State can be saved between pages. The value from a textbox on the first page can be saved and shown on the second page. A good way to create State in Drafter is to make a dataclass.
1from drafter import *
2from dataclasses import dataclass
3
4@dataclass
5class State:
6    message: str
7
8start_server(State("The original message"))
The code above does not result in a visible change, because we have not created any new routes that take advantage of the state. Let’s make a new route function that can show off the state.
 1from drafter import *
 2from dataclasses import dataclass
 3
 4@dataclass
 5class State:
 6    message: str
 7
 8@route
 9def index(state: State) -> Page:
10    return Page(state, [
11        "The message is:",
12        state.message
13    ])
14
15start_server(State("The original message"))
The new index function has a decorator (@route), just like the dataclass from before.
This decorator adds in the functionality to connect the function to a URL.
The name index is special, making this function the “default” webpage that will be shown.
As a route, the function must return a Page. The Page dataclass constructor is provided by Drafter
and has two parameters: the new state of the page and a list of strings that will be displayed on the webpage.
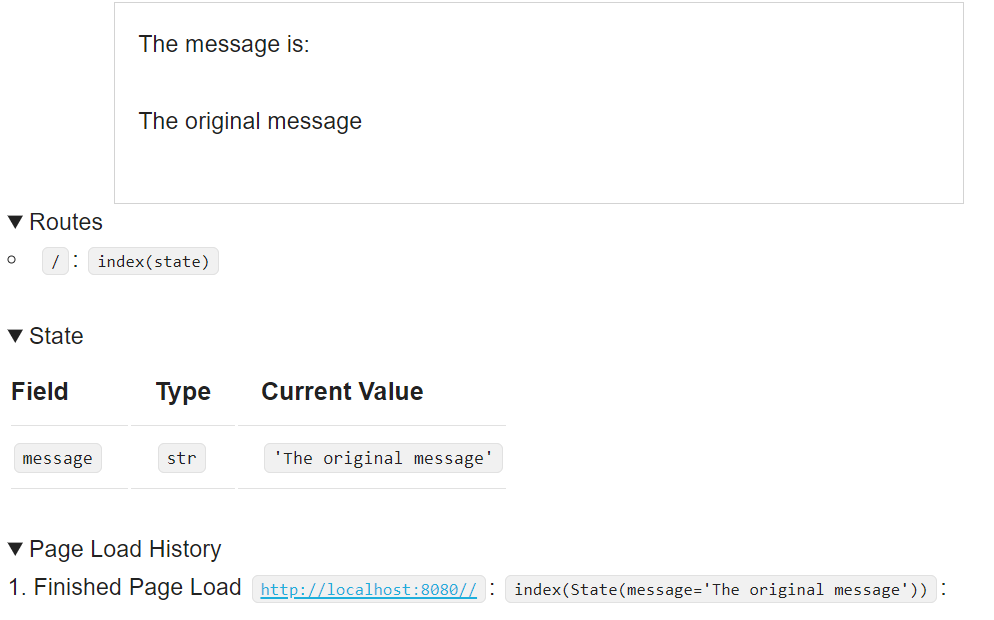
In this case, the webpage will have two lines of text: “The message is:” and “The original message”.
We usually will keep passing in the same state, and just update the state’s values mutably.
After you add the code above, you will need to stop the original server and start the new one. If you visit the url http://localhost:8080/ then you will see a page like this:
1. Another Route
We can see the state now, but the state is static - nothing ever changes. Let’s add in another page that changes the state.
 1from drafter import *
 2from dataclasses import dataclass
 3
 4@dataclass
 5class State:
 6    message: str
 7
 8@route
 9def index(state: State) -> Page:
10    return Page(state, [
11        "The message is:",
12        state.message
13    ])
14
15@route
16def change_message(state: State) -> Page:
17    state.message = "The new message!"
18    return Page(state, [
19        "Now the message is",
20        state.message
21    ])
22
23start_server(State("The original message"))
We’ve created a new route named change_message, we could actually visit if we changed the URL in the web
browser. However, that’s inconvenient for users. Instead, we can add a link to the index page to make it easier
for them to navigate there. We can do this easily by just providing a button.
 1from drafter import *
 2from dataclasses import dataclass
 3
 4@dataclass
 5class State:
 6    message: str
 7
 8@route
 9def index(state: State) -> Page:
10    return Page(state, [
11        "The message is:",
12        state.message,
13        Button("Change the Message", change_message)
14    ])
15
16@route
17def change_message(state: State) -> Page:
18    state.message = "The new message!"
19    return Page(state, [
20        "Now the message is",
21        state.message
22    ])
23
24start_server(State("The original message"))
Stopping the old server and running this new one will show that there is a button on the new page.
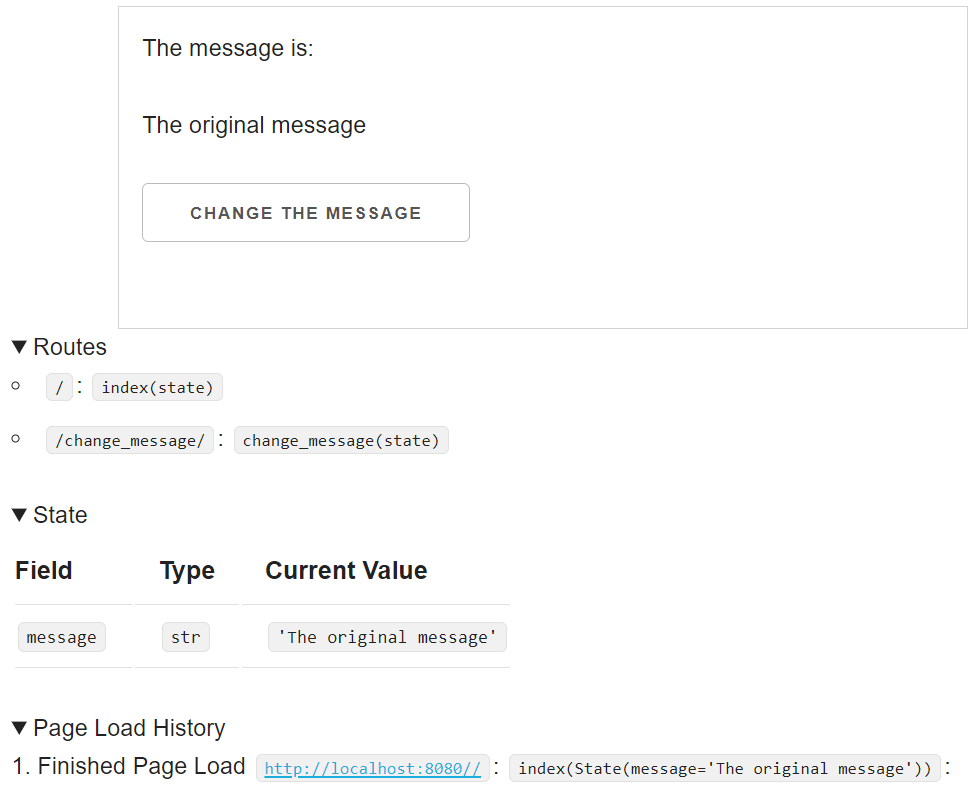
Once we click the button, we are taken to the new page.
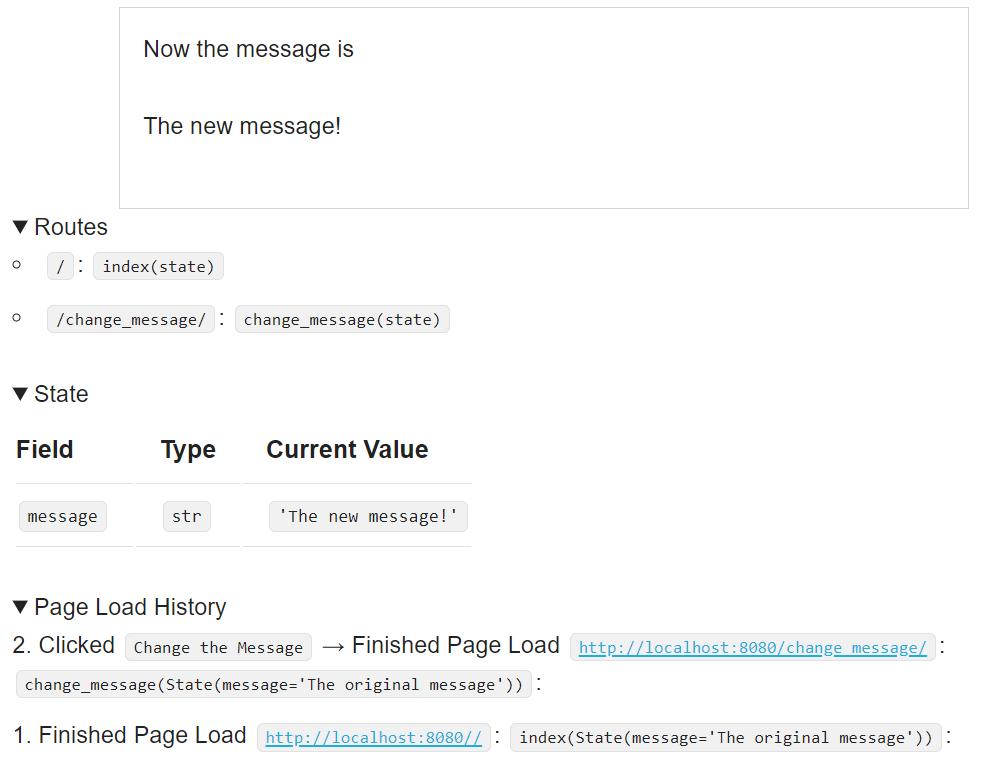
Note that the State has changed and there is now a new item in the Page Load History. This state is not very exciting, though, so maybe we can provide the user with an opportunity to change the message too?
2. Taking Input
Let’s add a TextBox to the change_message page. This is a Component, just like the Button we added before.
 1from drafter import *
 2from dataclasses import dataclass
 3
 4@dataclass
 5class State:
 6    message: str
 7
 8@route
 9def index(state: State) -> Page:
10    return Page(state, [
11        "The message is:",
12        state.message,
13        Button("Change the Message", change_message)
14    ])
15
16@route
17def change_message(state: State) -> Page:
18    state.message = "The new message!"
19    return Page(state, [
20        "Now the message is",
21        state.message,
22        "Would you like to change the message?",
23        TextBox("new_message", state.message)
24    ])
25
26start_server(State("The original message"))
The first argument to the TextBox constructor call is the name of the field, which will be necessary to use the value from the field later on.
The second argument is the default value of the TextBox when the page displays, which should be the current message’s value.
To actually use whatever value the user ends up typing into the box, we need to create a new Button and a new route function.
 1from drafter import *
 2from dataclasses import dataclass
 3
 4@dataclass
 5class State:
 6    message: str
 7
 8@route
 9def index(state: State) -> Page:
10    return Page(state, [
11        "The message is:",
12        state.message,
13        Button("Change the Message", change_message)
14    ])
15
16@route
17def change_message(state: State) -> Page:
18    state.message = "The new message!"
19    return Page(state, [
20        "Now the message is",
21        state.message,
22        "Would you like to change the message?",
23        TextBox("new_message", state.message),
24        Button("Save", set_the_message)
25    ])
26
27@route
28def set_the_message(state: State, new_message: str) -> Page:
29    state.message = new_message
30    return index(state)
31
32start_server(State("The original message"))
Now, when the user clicks the Save button, they will be taken to the set_the_message URL.
That route function takes a parameter named new_message, which matches the name of the field we created in change_message.
Drafter will translate the data from the box to the page, and we use that to update the state.
In the return statement of set_the_message, we call the index function to reuse its logic for rendering the basic page.
We could have instead created a new page that linked back to the original index page - the design was really up to us.
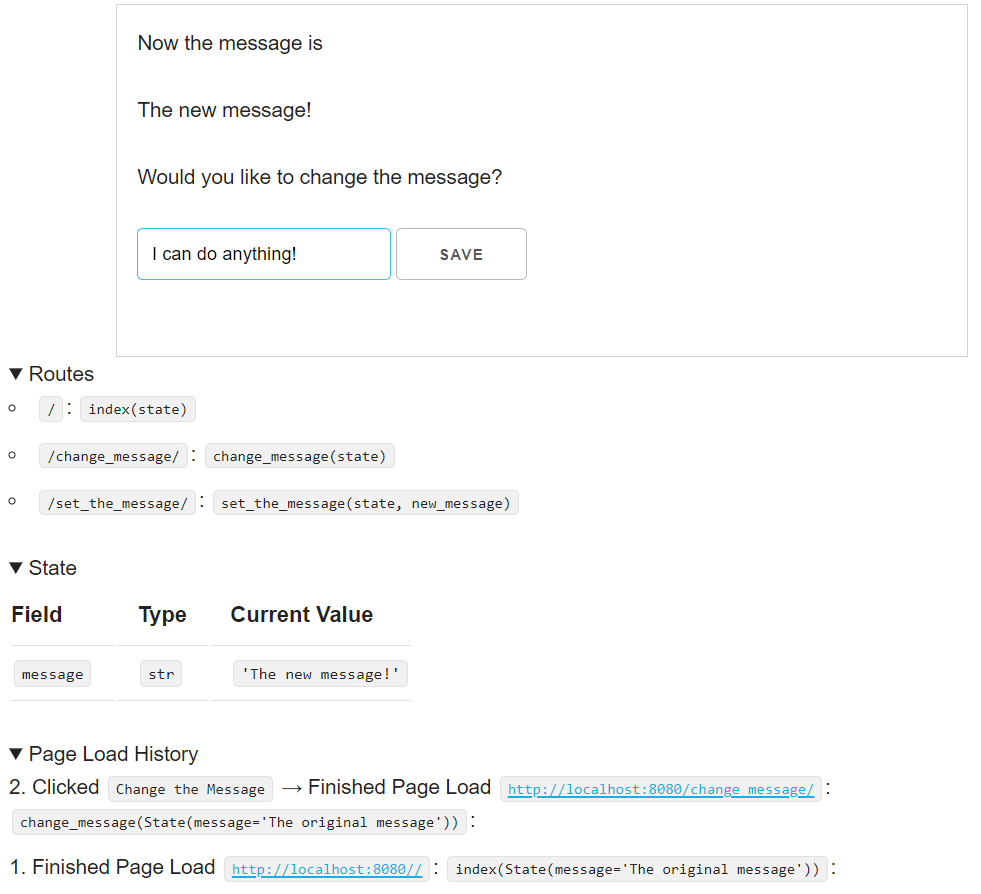
Rerunning the site will allow you to change the message dynamically. But the site is still not very engaging. Let’s add some more interactivity.
3. More Interactivity
We’re going to create another page, which will have two possible images, controlled by a CheckBox. First, we create the new page.
 1from drafter import *
 2from dataclasses import dataclass
 3
 4@dataclass
 5class State:
 6    message: str
 7
 8@route
 9def index(state: State) -> Page:
10    return Page(state, [
11        "The message is:",
12        state.message,
13        Button("Change the Message", change_message),
14        "You can use the button below to go see a picture",
15        Button("View the picture", view_picture)
16    ])
17
18@route
19def change_message(state: State) -> Page:
20    state.message = "The new message!"
21    return Page(state, [
22        "Now the message is",
23        state.message,
24        "Would you like to change the message?",
25        TextBox("new_message", state.message),
26        Button("Save", set_the_message)
27    ])
28
29@route
30def set_the_message(state: State, new_message: str) -> Page:
31    state.message = new_message
32    return index(state)
33
34@route
35def view_picture(state: State) -> Page:
36    return Page(state, [
37        Image("https://placedog.net/500/280?random"),
38        Button("Return to the main page", index)
39    ])
40
41start_server(State("The original message"))
We’ve now created a new page where an image of a dog will appear. There is also a button to take the user back to the original page.
What if users don’t like dogs? It’s a possiblity that we want to prepare for. We can provide a CheckBox to control whether they encounter a picture of a dog or not. We will want to remember the decision of whether they see a dog when we return to the index, so it’s important that we store this as part of the State.
 1from drafter import *
 2from dataclasses import dataclass
 3
 4@dataclass
 5class State:
 6    message: str
 7    likes_dogs: bool
 8
 9@route
10def index(state: State) -> Page:
11    return Page(state, [
12        "The message is:",
13        state.message,
14        Button("Change the Message", change_message),
15        "Are you okay seeing pictures of dogs?",
16        CheckBox("are_dogs_okay", state.likes_dogs),
17        "You can use the button below to go see a picture",
18        Button("View the picture", view_picture)
19    ])
20
21@route
22def change_message(state: State) -> Page:
23    state.message = "The new message!"
24    return Page(state, [
25        "Now the message is",
26        state.message,
27        "Would you like to change the message?",
28        TextBox("new_message", state.message),
29        Button("Save", set_the_message)
30    ])
31
32@route
33def set_the_message(state: State, new_message: str) -> Page:
34    state.message = new_message
35    return index(state)
36
37@route
38def view_picture(state: State, are_dogs_okay: bool) -> Page:
39    if are_dogs_okay:
40        url = "https://placedog.net/500/280?random"
41    else:
42        url = "https://placekitten.com/500/280?random"
43    state.likes_dogs = are_dogs_okay
44    return Page(state, [
45        Image(url),
46        Button("Return to the main page", index)
47    ])
48
49start_server(State("The original message", True))
Now we have a new field in our state named likes_dogs.
We must not only update the dataclass definition, but also the initial value in the constructor.
Separately, we also have a CheckBox in the index. The first argument is the name of the
checkbox, which will become a parameter in the view_picture function. The second argument is
the current value of the checkbox, which comes from our state.
In the view_picture function, we take the are_dogs_okay parameter (a boolean, since it
came from a checkbox) and use it to decide which URL we show.
We also update the state.likes_dogs field; this will make sure that when the user returns to the
index page, their decision is retained.
We’ve added a lot of features to our website, and testing the entire site takes a lot of clicking. It’s time to setup some tests, so we can make sure the website is working correctly even as we change parts.
4. Testing
Drafter works perfectly well with the Bakery library to write assert_equal statements.
We can call a route function and check that the produced Page matches the expected result.
This does require writing fairly lengthy statements, though:
 1from drafter import *
 2from dataclasses import dataclass
 3from bakery import assert_equal
 4
 5@dataclass
 6class State:
 7    message: str
 8    likes_dogs: bool
 9
10@route
11def index(state: State) -> Page:
12    return Page(state, [
13        "The message is:",
14        state.message,
15        Button("Change the Message", change_message),
16        "Are you okay seeing pictures of dogs?",
17        CheckBox("are_dogs_okay", state.likes_dogs),
18        "You can use the button below to go see a picture",
19        Button("View the picture", view_picture)
20    ])
21
22@route
23def change_message(state: State) -> Page:
24    state.message = "The new message!"
25    return Page(state, [
26        "Now the message is",
27        state.message,
28        "Would you like to change the message?",
29        TextBox("new_message", state.message),
30        Button("Save", set_the_message)
31    ])
32
33@route
34def set_the_message(state: State, new_message: str) -> Page:
35    state.message = new_message
36    return index(state)
37
38@route
39def view_picture(state: State, are_dogs_okay: bool) -> Page:
40    if are_dogs_okay:
41        url = "https://placedog.net/500/280?random"
42    else:
43        url = "https://placekitten.com/500/280?random"
44    state.likes_dogs = are_dogs_okay
45    return Page(state, [
46        Image(url),
47        Button("Return to the main page", index)
48    ])
49
50assert_equal(index(State("My message", True)),
51             Page(State("My message", True), [
52                "The message is:",
53                "My message",
54                Button("Change the Message", change_message),
55                "Are you okay seeing pictures of dogs?",
56                CheckBox("are_dogs_okay", True),
57                "You can use the button below to go see a picture",
58                Button("View the picture", view_picture)
59             ]))
60
61assert_equal(set_the_message(State("My message", True), "New message"),
62             Page(State("New message", True), [
63                "The message is:",
64                "New message",
65                Button("Change the Message", change_message),
66                "Are you okay seeing pictures of dogs?",
67                CheckBox("are_dogs_okay", True),
68                "You can use the button below to go see a picture",
69                Button("View the picture", view_picture)
70             ]))
71
72start_server(State("The original message", True))
These two assert_equal statements check the index and set_the_message functions.
Those functions take in the current state (which we are free to make up).
The set_the_message function also takes in a Boolean argument (whether the user wants dog photos).
Both functions return a Page, which has the new resulting state and a list of the page content.
Getting the exact values correct can be tricky, but fortunately there is a way to simplify the process a little.
The Debug Information at the bottom of the page includes a section titled Page Load History.
Clicking on the Page Content arrow will reveal the generated Page content, which can be copy/pasted back as an
assert_equal along with the appropriate Call.
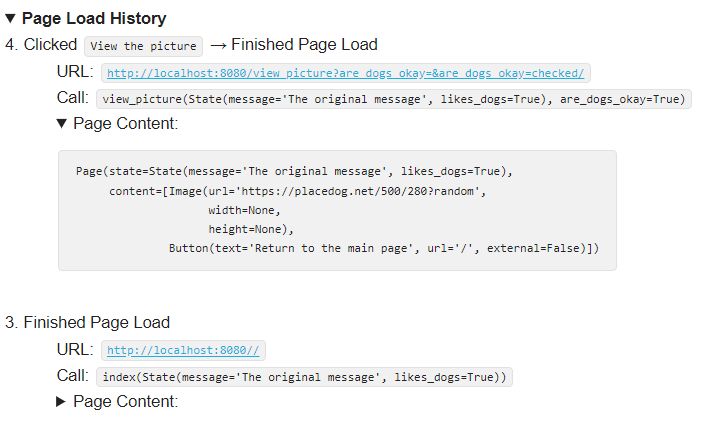
You might think of this as “freezing” the expected state of the website, if you are happy with the design.
Subsequent changes to the index function require us to update these tests, so you do not necessarily want to start
by testing (the way you are usually encouraged to do). But as you make changes, these tests can help you confirm
that the rest of the site still works as originally intended.
5. Moving On
So now you have a very simple site. Here are some ideas for additions and extensions you can make:
Add more state and routes to the site, so that there are more pages.
Add another page with a numeric field (hint: you will need to check that the user entered text isnumeric and then convert it to an integer).
Use the SelectBox to make a dropdown list with several options.
Use the NumberedList or BulletedList to represent a list of values, and then use the append method to add a new item via a button.
Check out the documentation of Components to see all that you can add to your website!
And if you want a longer example, check out the calculator example to see a more complicated web application.